How should you use the Attio API for custom integrations?
By Daniel Hull ·
You should use the Attio API when your integration needs exceed what Zapier or Make can handle, whether that's volume, latency, data transformation complexity, or workflow logic that doesn't fit a trigger-action model. The API is well-designed, consistent, and covers nearly everything available in the Attio UI.
 The Attio API documentation at developers.attio.com showing the endpoint structure for record operations.
Getting started with authentication
The Attio API uses bearer token authentication. You create an API key in your workspace settings under the Integrations section, and include it in the Authorization header of every request. The format is straightforward: Authorization: Bearer your_api_key_here.
A few important notes about API keys. Each key has full access to the workspace, there's no scoped permissions per key at the time of writing. This means you should treat API keys like passwords: store them in environment variables, never commit them to version control, and rotate them periodically. If a team member who created an API key leaves, rotate that key immediately.
For production integrations, I recommend creating a dedicated API key for each integration rather than sharing one key across multiple systems. This makes it easier to rotate keys, track usage, and debug issues. Label each key clearly in Attio's settings ("Product sync - production," "Slack notification bot," etc.) so you know what will break if you revoke one.
Core API concepts
Attio's API is organized around a few core resources: objects, records, attributes, lists, entries, and notes. Understanding how these relate to each other is essential before you start building.
Objects are the containers (Companies, People, Deals, or any custom object you've created). Each object has attributes that define its schema. Records are the individual items within an object (a specific company, a specific person). Lists are filtered views of records, and entries are records that belong to a specific list (with optional list-specific attributes).
The API endpoint pattern is consistent across all these resources:
GET /v2/objectslists all objects in your workspaceGET /v2/objects/{object}/recordslists records for a given objectPOST /v2/objects/{object}/recordscreates a new recordPATCH /v2/objects/{object}/records/{record_id}updates an existing recordPUT /v2/objects/{object}/recordsupserts a record (create or update based on matching attribute)
This consistency is one of the best things about Attio's API. Once you understand the pattern for one resource, you understand it for all of them. Custom objects work exactly the same way as built-in objects, which is not the case with most CRM APIs.
Common API patterns
Here are the patterns I implement most frequently when building integrations for clients.
Syncing product data into Attio. This is the most common custom integration I build. Your application tracks user activity, feature usage, or subscription data that should be visible in the CRM. The pattern is: your backend collects the event, transforms it into Attio's attribute format, and upserts the record using email (for People) or domain (for Companies) as the matching key.
For a detailed walkthrough of this specific use case, see my guide on connecting Attio to your product data.
Creating records from external forms. When someone fills out a form on your website, you want a record created in Attio immediately. The API call is a simple POST to the records endpoint with the form data mapped to attribute values. Use the upsert endpoint so that returning visitors update their existing record rather than creating duplicates.
Bi-directional sync with another system. This is the most complex pattern. Changes in Attio should reflect in your other system, and vice versa. Use webhooks (covered below) for the Attio-to-external direction, and API calls for the external-to-Attio direction. The critical detail is conflict resolution: if both systems update the same record within a short time window, which one wins? Define this before you build, or you'll end up with data ping-ponging between systems.
Lead scoring automation. Pull data from Attio, calculate a score based on your criteria, and write it back. The API makes this clean: query records with specific attribute filters, run your scoring logic, and update each record with the computed score. I covered this in depth in my guide on lead scoring in Attio.
Working with webhooks
Webhooks allow Attio to push events to your system in real time. Instead of polling the API to check for changes, you register a URL and Attio sends HTTP POST requests to it whenever relevant events occur.
You can subscribe to events on specific objects: record created, record updated, record deleted. The webhook payload includes the full record data, so you typically don't need to make follow-up API calls to get the details.
Setting up a webhook through the API:
- Create an endpoint on your server that can receive POST requests
- Register the webhook through Attio's API or UI, specifying the target URL and the events you want to subscribe to
- Attio will send a verification request to confirm your endpoint is reachable
- Start receiving events
For production webhook implementations, handle these scenarios:
- Idempotency. Webhooks can fire more than once for the same event. Use the event ID to deduplicate on your end.
- Ordering. Events may arrive out of order. Don't assume that a "record updated" event with timestamp T2 will arrive after an event with timestamp T1.
- Failures. If your endpoint is down, Attio will retry with exponential backoff. Make sure your endpoint returns a 200 status quickly (within a few seconds) and processes the event asynchronously.
- Security. Validate the webhook signature to confirm the request actually came from Attio. Don't process payloads you can't verify.
Rate limits and best practices
Attio's API has rate limits that you need to respect, especially during bulk operations. The current limits allow a reasonable number of requests per minute per workspace. If you exceed the limit, the API returns a 429 status code with a Retry-After header telling you how long to wait.
Best practices for staying within limits:
- Implement exponential backoff for rate-limited requests. Start with a one-second delay, double it on each subsequent 429, and cap at thirty seconds.
- Batch your reads. Instead of fetching one record at a time, use the list endpoint with filters to get multiple records per request.
- Cache frequently accessed data. If you're looking up the same company record ten times in an hour, cache the result locally.
- For bulk imports, pace yourself at about one request per second. This is well within limits and gives you clean, debuggable logs.
For ongoing sync integrations, the combination of webhooks (for real-time updates from Attio) and batched API calls (for pushing updates to Attio) is the most efficient pattern. Avoid polling the API on a timer to check for changes. Webhooks exist specifically to eliminate that pattern.
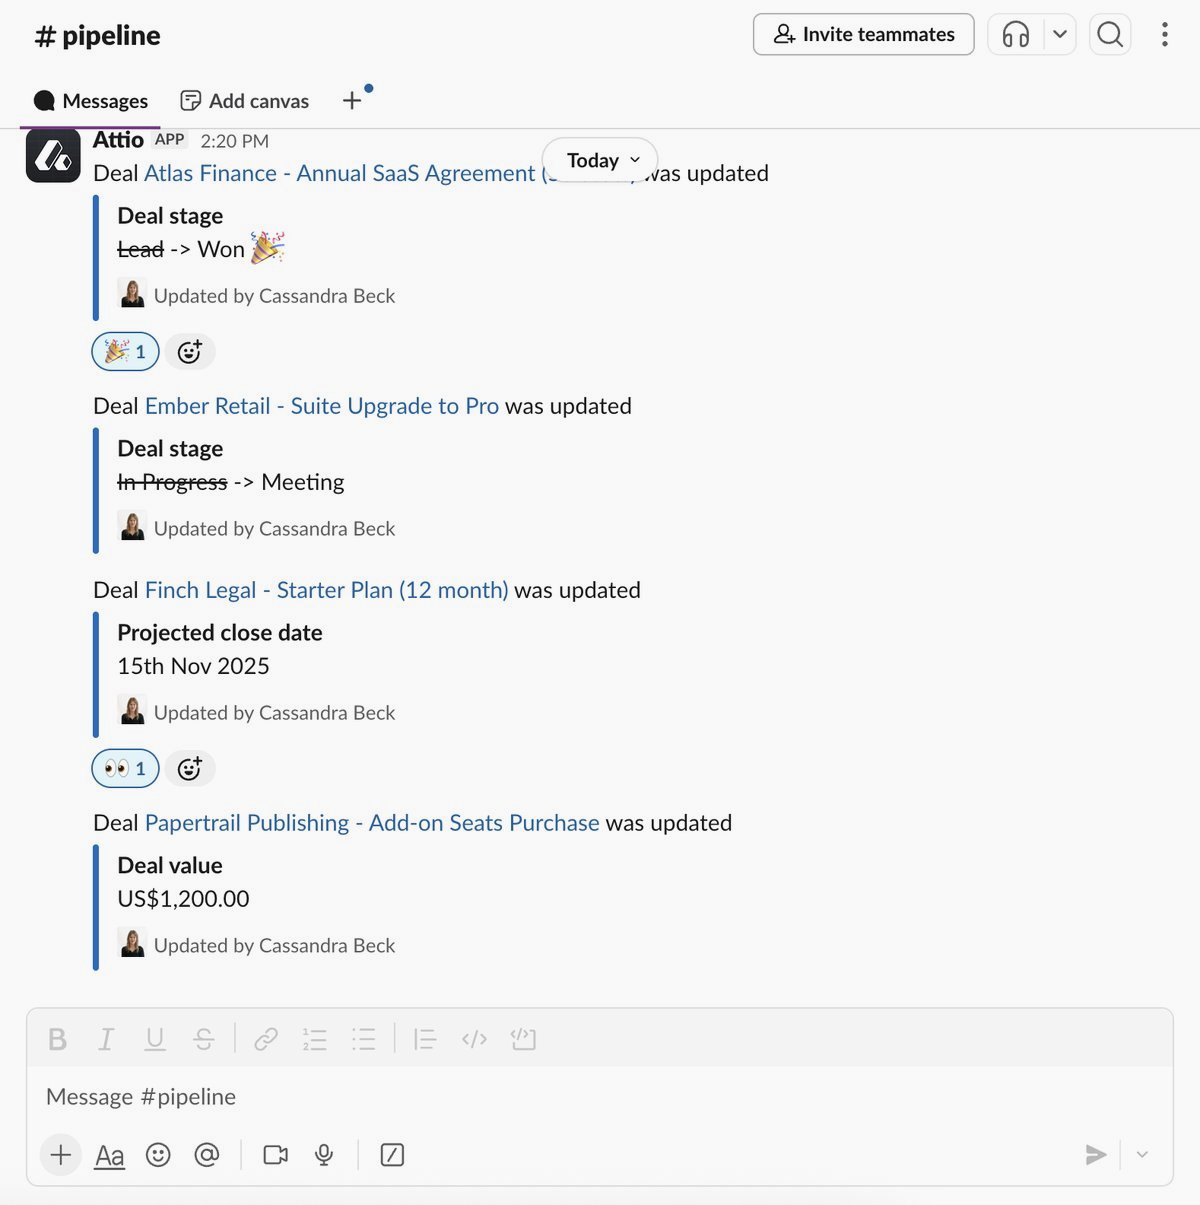
Building a deal notification system
Let me walk through a practical example: building a custom deal notification system that posts to Slack when a deal moves to a specific pipeline stage.
First, register a webhook that listens for record updates on your Deals object. When the webhook fires, your handler checks whether the status attribute changed and whether the new status is the one you care about (say, "Proposal Sent").
Your handler extracts the deal name, value, and owner from the webhook payload. It then formats a Slack message using the Slack API and posts it to the appropriate channel. You can enrich the message by making additional Attio API calls to fetch the related company name and primary contact.
This is a pattern that Zapier can handle, and for simple notifications I'd use Zapier. But when you want conditional logic (only notify for deals above a certain value), enriched messages (pull in company data and recent interaction history), or multi-channel routing (different Slack channels for different deal types), the API integration gives you the flexibility that no-code tools can't match. You can also use the API to power lead scoring workflows and deal routing automations that go beyond what Attio's built-in automation engine supports.
Error handling and logging
Production integrations need robust error handling. The Attio API returns standard HTTP status codes: 200 for success, 400 for bad request (usually a validation error), 401 for authentication failure, 404 for not found, 422 for unprocessable entity, and 429 for rate limiting.
For each API call, log the request (endpoint, key parameters), the response status, and any error details. When something fails at 2 AM, these logs are the difference between a five-minute fix and a two-hour debugging session.
Common error scenarios and how to handle them:
- 400 Bad Request. Usually means an attribute value doesn't match the expected format. Check that select values match existing options, dates are in ISO 8601 format, and relationship references point to existing records.
- 404 Not Found. The record or object you're referencing doesn't exist. If you're using record IDs from a cache, the record may have been deleted.
- 422 Unprocessable Entity. The request is well-formed but the data doesn't meet Attio's validation rules. Common with required attributes that are missing.
- 429 Rate Limited. Back off and retry. This is expected behavior during bulk operations, not an error.
Structuring your code and choosing the right tool
For any integration beyond a simple script, structure your code with a separation between the Attio API client, your business logic, and your data transformation layer.
The API client handles authentication, rate limiting, retries, and error classification. It shouldn't know anything about your business logic. The business logic layer decides what to sync, when to sync it, and how to handle conflicts. The transformation layer maps data between your system's format and Attio's attribute format.
This separation makes your integration testable (you can mock the API client), maintainable (business logic changes don't require touching the API layer), and debuggable (you can pinpoint whether the issue is in API communication, business logic, or data transformation).
For teams building their first Attio integration, start with a simple one-directional sync: push data from your system into Attio. Get that working reliably before adding webhook listeners, bi-directional sync, or complex conditional logic. Every layer of complexity you add before the foundation is solid multiplies your debugging time.
The API is the right choice when:
- You're syncing more than a few hundred records per day
- You need sub-minute latency on data updates
- Your workflow has conditional logic that no-code tools can't express
- You need custom error handling and retry logic
- You're building a product integration (your SaaS product syncs data to your customers' Attio workspaces)
Zapier or Make is the right choice when:
- You're connecting two tools with a simple trigger-action pattern
- Volume is low (under a few hundred executions per day)
- You don't have engineering resources to build and maintain an integration
- The workflow is straightforward enough that visual builders can express it
Many teams use both. Zapier handles the simple connections (form submissions create records, deal stage changes trigger Slack messages), while a custom API integration handles the heavy lifting (product data sync, bulk imports, automated deal routing). The key is choosing the right tool for each specific workflow rather than trying to force everything through one approach.